Erosion Control
Principles behind the tools
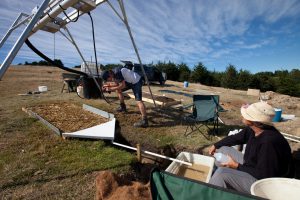
EOS Ecology trialling erosion control techniques on Port Hills’ loess soils (Source: EOS Ecology Limited).
Using erosion control tools and techniques is now considered not only good practice, but essential practice. It is both known in the industry and proven by research that applying these tools correctly works. For example, in 2016 Environment Canterbury commissioned EOS Ecology Limited to research erosion of Canterbury’s soil loss under different erosion treatment conditions, compared with a bare, exposed control area of soil.
The 2016 EOS research paper (PDF 4.66 MB) found that:
- Treating or covering soil reduces soil erosion up to 90%
- Even the least successful techniques achieved 50% reduction
- Erosion is best minimised by mixing and matching from the whole toolbox of tools
- Reducing erosion and sediment discharge gives you the best chance of achieving good water quality.
To choose the best tool for each context, you need to understand the principles behind what you are aiming to do. This section covers the following non-structural erosion control principles that you can apply at all stages of your project’s planning, construction and maintenance.
Minimise disturbance
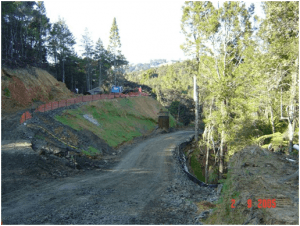
Roading construction site where unnecessary disturbance has been minimised by keeping as much indigenous vegetation as possible (Source: SouthernSkies).
For any development, do the earthworks – including temporary works – over the smallest area that you can while still achieving the design outcome. To meet this principle, you can:
- Only disturb areas that can be covered or stabilized before bad weather or high winds arrive.
- Identify existing site attributes and incorporate them into the project designs, to minimise the amount of earthwork that you need to do.
- Fit land development around where the land is sensitive. For example, where possible, avoid disturbing steeper slopes and features such as streams and wetlands.
- Apply the principles of staging and quick stabilisation to minimise the area of exposed disturbed soil.
On your ESC Plan, show all limits of disturbance. On site, show the limits clearly using fences, signs and flags.
Do the construction in stages
Doing bulk earthworks over the whole site at once means that you are exposing more soil at once and making it prone to erosion. If you only expose the area that you are working on and can stabilise and complete at that time, you reduce the risk of erosion and sediment discharge. This principle is called ‘earthworks staging’, which means doing earthworks in smaller sections and over time, while progressively revegetating the site.
You need to plan the staging alongside the overall construction timetable and sequencing to make sure that the timing meets everyone’s needs and requirements, including that of all contractors. The location of temporary stockpiles, access and utility service installation all needs to be planned.
Record the detail of the earthworks staging and sequencing in the ESC Plan.
Protect slopes
Avoid disturbing existing slopes wherever possible, especially steep ones.
If you have worked a slope that needs stabilising, applying simple vegetative covers like topsoiling and seeding may not be enough. Consider texturing slopes, and applying compost, polymers, straw mulch or other protective surface covers.
You might also need to divert clean water runoff from above the site away from the exposed slopes.
Highlight slopes on the ESC Plan, as well as the limits of disturbance and any works and areas requiring specific protection.
Protect waterways
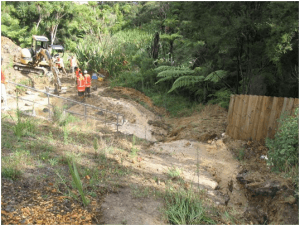
Severe damage to a waterway resulting from a lack of protection—the cost of remediation vastly outweighed the cost of effective erosion control (Source: SouthernSkies).
It is essential to protect waterways to avoid sediment discharges.
To do earthworks and remove vegetation from beside or within streams (including ephemeral/intermittent streams), wetlands and the coast, usually requires a consent from Environment Canterbury. So, consult with Environment Canterbury before finalising your project designs.
Map all existing waterways, proposed drainage patterns, limits of disturbance and protection measures on the ESC Plan. Also mark all the practices to be used to protect new drainage channels, as well as crossings, disturbances and associated construction methods.
For more information on this topic, see our Waterways section.
Stabilise exposed areas quickly
Stabilise disturbed soils with vegetation, compost, mulch, grassing or other stabilising methods that are appropriate to the site. Do this as soon as possible after the earthworks – for example, do it progressively after each earthworks stage and at specific milestones within stages.
Watch out for useful weather windows to do stabilising work. For example, put stabilising measures in place before rain or strong wind is forecast. In Canterbury rain can be infrequent, so there are often great opportunities to get exposed areas stabilised before the bad weather hits. But likewise, strong winds are common, so stabilising soils before the winds hit is vital to stop soil and dust blowing away and causing nuisance to neighbours.
Record the expected timings for grass or mulch covers clearly in the ESC Plan, eg record when you sowed the grass seed and when you expect a strike. Monitor the situation closely to see whether the strike is successful and take action if not. Also record your plans for temporary cover if you see erosion start to develop or there is poor germination.
For more information on this topic, see our sediment control section.
Consider the weather

Prepare for bad weather so that you aren’t caught out with inadequate erosion or sediment control measures in place.
Weather affects the potential for erosion both directly and indirectly:
- Raindrops dislodge soil particles and runoff carries the particles away
- The annual pattern of rainfall and temperatures affects how much vegetation grows, and how quickly.
Canterbury often experiences long windows of dry weather, which are perfect for getting earthworks done. However, all parts of Canterbury can experience severe, intense storms at any time of the year so you need to have measures in place. Canterbury’s strong and gusty drying winds are most common in late spring and autumn, and erode soil and make dust a real problem. Manage your site to minimise the loss of soil through wind erosion by having an effective plan and using tools from this toolbox.
Rainfall varies across the region. Average annual rainfall in Christchurch is around 650 mm, Timaru around 590 mm and in the Canterbury Plains it’s less than 1000 m. Whereas mountainous areas receive metres of rain per year – eg Arthur's Pass gets more than 4m!
It is essential to do specific high risk activities – like streamworks – when a period of fine weather is forecast. Pay attention to weekly and longer range forecasts when scheduling works and preparing sites.
Mix and match your tools
This toolbox is full of practical tools and techniques, and it’s important to realise that you will have to draw on the whole toolbox. This is for two main reasons.
Your normally preferred tool may not work for this project. For example:
- Wind conditions and the angle of a slope can determine your choice of material, eg straw (low slopes, low wind) or geotextiles (steeper slopes, stronger wind)
- Soil type can affect your approach. For example, topsoiling is not normally recommended as an effective stabilisation tool on its own (until the vegetation seeding has established), but on Canterbury’s highly erodible loess soils it can still be a useful temporary measure. It absorbs rain better than the loess can and therefore reduces the erosion potential and sediment runoff
- The nature of the site can demand an unusual approach. For example, on a small site like a retaining wall being built on a slope, laying an impermeable plastic sheet overnight is effective against overnight rain, even if the normal runoff controls are not in place.
No one tool will work for the whole project
Different tools are needed at different stages. You will have to monitor the situation and change and adjust the tools for changing circumstances.
Applying a series of tools progressively is something that you should plan for in your ESC plan. The approach is sometimes called a ‘treatment train’, and here are some examples of how it works:
- Erosion control tools are correctly applied (eg straw, check dams, or surface roughening), but inevitably a reduced amount of sediment is still generated. This can be made worse by the nature of the site or the soil type or the project size. So sediment control tools are still needed downslope to handle runoff (eg sediment retention ponds or flocculation)
- Erosion control tools are not correctly applied (eg hydromulch or copolymer is not sprayed to 100% coverage), so the application has to be repeated or a different tool applied quickly, and sediment control tools will still be needed
- A temporary erosion control tool is applied but only until a permanent erosion control tool is operational. For example, soil is cut and exposed so needs to be covered or stabilised straight away until the permanent control tool is fully in place, eg vegetation or surface sealing
- Using sediment control tools without erosion control tools is not effective. For example, placing silt fences or silt socks on their own will not reduce erosion, and they will quickly become swamped and not capture sediment effectively. Erosion and sediment control tools need to be planned as an integrated approach and a sequence of tools
- For more on water management control, see the concentrated water flows section
